Programmer's Guide
Framework elements
Forms
CloudaIDE user Interacts with the system through forms. Forms can call each other thus organizing the flow of user interaction.
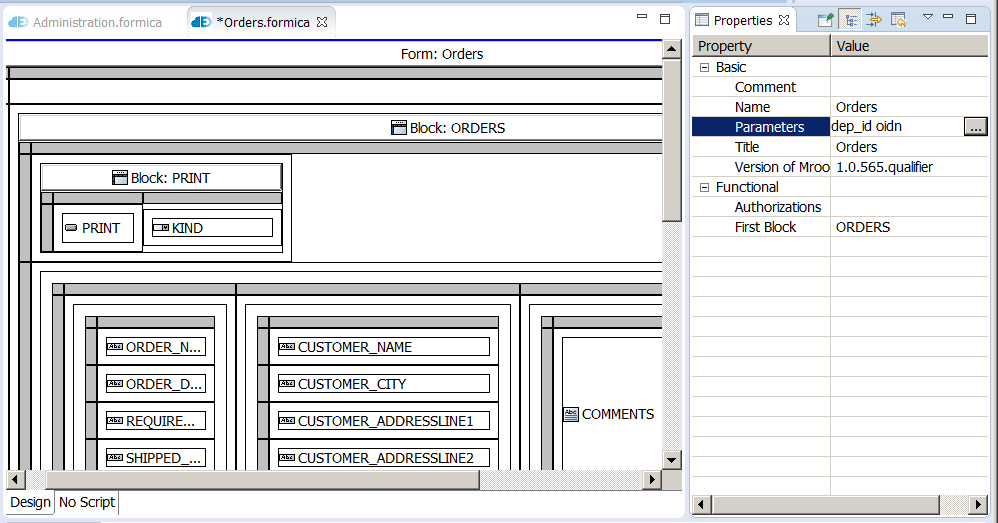
Figure 1.
Form
Form contains screen layout elements, blocks, triggers and procedures.
The properties of the form are:
- Comment
- comment on the form.
- Name
- form name. Should conform to the Java class name syntax. The name of the form should be equal to the name of the *.formica file containing the form. So the Orders form should reside in the Orders.formica file.
- Parameters
-
list of parameters with which the form can be called. The syntax of the list is the same as parameter declarations of procedures. In fact, form behave like procedures.
dep_id oidn, p_amount in out number, p_vat_code textParameters are similar to procedure parameters and are local for the form. Parameters in the MT language are reffered by prefixing them with :patameter string.
:parameter.p_vat_codeTo open a form the developer calls the open_form procedure.
open_form(Orders, :DEPARTMENT.ID, v_max_amount,'P35'); - Title
- the title of the form, that is displayed to the user.
- Version of CloudaIDE
- the CloudaIDE version number of the last form file modification.
- Authorizations
- the title of the form, that is displayed to the user.
- First Block
- the default first navigation block of the form. Required if the form is to be run as List of Values.
- Decoration
- If set to "Yes" the form will have decoration (borders, margins) elements making the form to stand-out on the screen. Otherwise the form will be horizontally centered without without margins above and under the form thus saving space.
List of Values
In CloudaIDE you create a list of values as a specialized form. For example, to let the user choose an employee create the EmployeeList form.
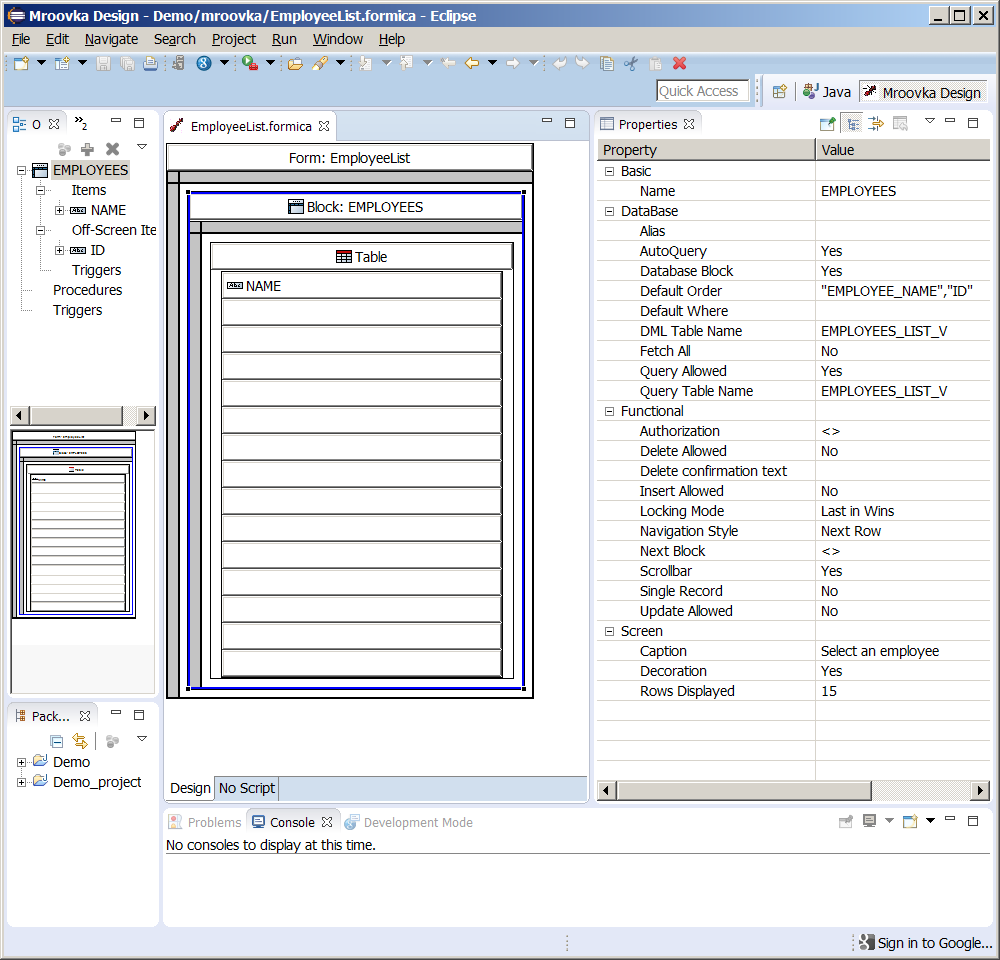
Figure 2.
List of value form
Here is what the EmployeeList form looks like in the Form Editor. You see in the Outline View that the block consists with NAME item and ID off-screen item. The NAME item is put into a table. The EMPLOYEES block has "Delete Allowed", "Update Allowed" and "Insert Allowed" properties set to false. This makes the form a query-only form. This is not necessary, but it is justified in this case. It is very often case that updating data in the lists is highly desirable and in the next example this will be the case. The "Rows Displayed" property is set 15. The rows in the block are ordered according to EMPLOYEE_NAME and ID columns.
We will use this list to select the employee, to whom an employee reports. Let's look on the Employees form:
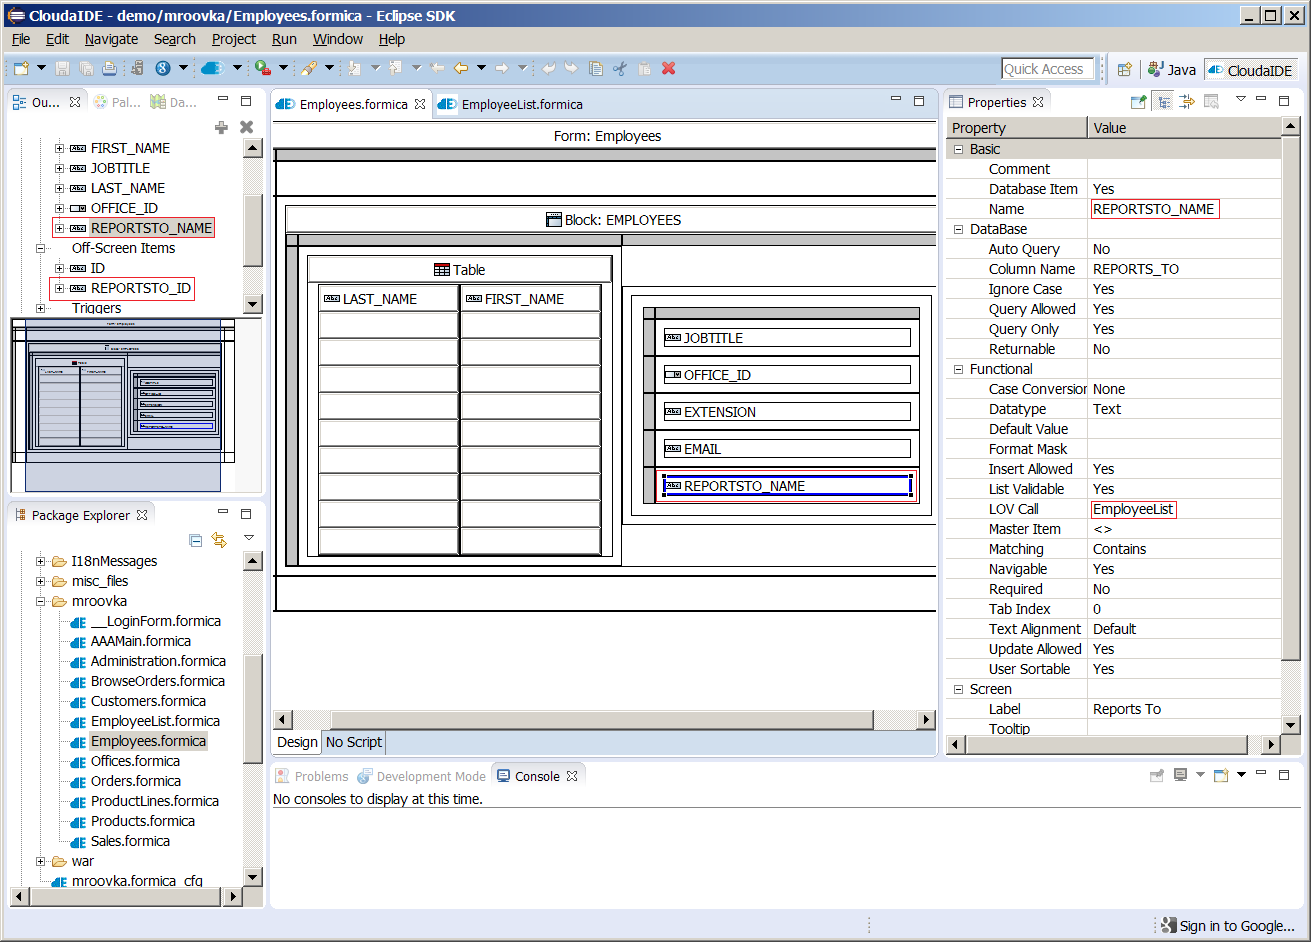
Figure 3.
Employees form
To make a textbox a list item several things have to be done.
- The textbox "LOV Call" property has to be set to the call of the LOV form. It consists of the name of the LOV form and a list of arguments for the called form if applicable. EmployeeList (without arguments) in this case. If the called form has parameters the arguments have to match to the parameters.
- CloudaIDE uses a naming convention to bind the form and the list items. The textbox name has to be comprised of two underscore separated parts. The prefix (REPORTSTO) and the name of the corresponding list item (NAME). So the name of the item will be REPORTSTO_NAME. The REPORTSTO_ID item will receive it's value from the ID item of the main block of EmployeeList form.
- To make CloudaIDE to call the list on validation of the item the "List Validable" property has to be set to true.
- Look at the "Query Only" property of the REPORTSTO_NAME item. It is set to true. This means, that this item will not be directly updated by CloudaIDE. The item that will be updated is REPORTSTO_ID
The list functions the following way. When the user types something into the item and leaves it (if the item "List validable" property is set to true) the list form is called. The most basic scenario of the LOV processing is the Automatic Match Processing. It is performed when after NEW_FORM trigger if the main block is empty.
Otherwise if the main block contains exactly one row or the first rows query item value equals „searched for” value then the rows values are passed to the corresponding items of the calling block. In the case of multiple rows the list is displayed with the rows shown.
Automatic match processing
Automatic match processing is the following procedure. The list form performs an automatic query for the rows containing the text just typed. If exactly one row is found or the first rows query item value equals „searched for” value then the rows values are passed to the corresponding items of the calling block. If no row is found then the list form is shown in enter query mode. If more than one rows are found then the list is shown with the query result.
In case of necessity the programmer can use is_list() and list_item_text() built-ins to control the NEW_FORM trigger behaviour. Also the NEW_FORM trigger can be used to tailor the form to assure very fancy list behaviour, superseding automatic list processing.
If the user wants to call a form to make more specific query then the user has to press Show-List (F9) key or click the list icon. The list form opens.
The user can select (navigate to or create if the list form is insert enabled) a list row then he/she has to press Select key combination (Shift-Enter) or click the ”Back” icon. If the user decides not to select any value then he has to press the Close Form key combination (Ctrl-Enter) or click Cancel/Close Icon.
The LOV can be used to navigate/disclose the meaning of codes even when the LOV Item is not updateable. Just press F9 or click LOV icon. To it to work, all the Items corresponding to PK Items of the LOV Form have to be set. This way the user achieves additional possibilities to navigate data without any programming effort.
Triggers
Triggers are pieces of code that react to particular events on the client. The triggers are written in MT language (see MT language reference). The triggers can be defined at three levels – form, block and item. Every trigger has it's inherent definition level. An Item level trigger (e.g. VALIDATE_ITEM) can be defined also at block and form level. It will fire at all items belonging to definition level (item, form or block).
Item Level Triggers
- VALIDATE_ITEM – fires after leaving item or block when the item valid status is set to false. An Item receives invalid status when it is an item of a newly created record or is changed by the user or the valid status is set to false by set_item_property built-in. If it fails – the cursor is placed in the item.
- KEY_DUPLICATE_RECORD – replaces usual duplicate_record processing.
- BUTTON_PRESSED – fires when button is pressed – it can be defined only on the item – button level.
- KEY_NEXT_ITEM – trigger will fire whenever the user try to move the control (i.e., cursor) from one item to another item in the form by pressing return key or tab key. The default processing of these keys will be replaced by this trigger.
- KEY_LIST_VALUES - replaces usual list values processing.
- VALUE_CHANGED – fires when a listBox or checkbox value is changed.
- CLICK, DOUBLE_CLICK – triger will fire on textboxes and textareas. Never define both triggers on the same item. In this case only CLICK trigger will fire.
- KEY_DEV_OTHER - fires when the user presses Ctrl-F2.
- KEY_ENTER_QUERY – replaces start enter query (Functional Key F7) processing.
- KEY_EXECUTE_QUERY – replaces execute query (Functional Key F7) processing
- KEY_PRESSED – fires when a key is pressed
Block Level Triggers
- VALIDATE_RECORD – fires after any change has been made to a record values. If it fails the cursor goes to the first navigable item of current record.
- NEW_RECORD_INSTANCE – fires when any item of a record different than the item of a previously focused record of this block receives focus. Trigger fires also after successful insertion of row into a database in a database block.
- PRE_DELETE – fires immediately before the current record is about to be deleted. If it fails no delete operation is performed.
- PRE_INSERT – fires immediately before the current record is about to be inserted. If it fails no insert operation is performed.
- PRE_UPDATE – fires immediately before the current record is about to be updated. If it fails no update operation is performed.
- POST_DELETE – fires immediately after the current record has been deleted.
- POST_INSERT – fires immediately after the current record has been inserted.
- POST_UPDATE – fires immediately after the current record has been updated.
- POST_QUERY – fires after first batch of the block rows (or all records if Fetch All block property is set to yes) arrives to the client.
Form Level Triggers
- PRE_FORM – fires before the cursor goes to the first item of the form. It is used to set default values of form items programmatically.
- NEW_FORM – fires after initialization of the form. Can be used to populate blocks with data by the means of execute_query for example.
- PRE_CLOSE – fires before closing the form. Typical usage is cleaning resources held by the form. If returns false then the form will not be closed.
As an example let us take the Orders form and the DETAILS block. Three VALIDATE_ITEM triggers are used to calculate the total price ITEM. The triggers are attached to PRODUCT_CODE, PRODUCT_MRSP (price) and QUANTITY ORDERED. The three triggers have the same text.
The calculate_total procedure is called to calculate line total. The trigger on PRODUCT_CODE is necessary because after list validation the PRODUCT_MRSP item is set to valid and no validation of the item occurs, although it is changed by the selection from the list.
Breadcrumb Menus
Breadcrumb menus are meant to facilitate quick return to a selected form. The forms are stack organized. Any form can contribute itself to breadcrumb menu. To do so a set_breadcrumb built-in has to be called. For example set_breadcrumb('Orders'). After this call in the breadcrumb menu the "Orders" menu option will be shown. After navigation down the stack to other form (e.g. Customers an further ) the user will have the possibilty to click on the "Orders" option. After this all intermediate forms will be closed and the "Orders" form will be shown.
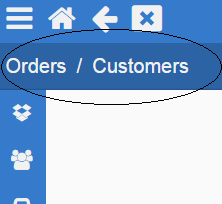
Figure 4.
Breadcrumb Menu
Reports
BIRT reports
CloudaIDE is integrated with the BIRT (Business Intelligence end Reporting Tools). To execute a report the run_report built-in procedure has to be called. The Orders form of the demo application has the following BUTTON_PRESSED trigger.
It has two calls of the procedure. The first call executes the report passing the :ORDERS.ID parameter. This prints a single Order. The second call uses criteria_block phrase. This phrase informs the system to pass a p_where parameter containing SQL boolean expression that was used lately to process the query in the Orders block. Using it the report programmer can instruct the report to limit the dataset to records conforming to the expression by including it into the property binding text.
The mv_order report has to be declared in the application configuration file mroovka.formica_cfg
Further discussion of the BIRT report generator is beyond the scope of this guide.
Jasper reports
Cloudaide is integrated with Jasper Reports version 6.20. To execute a report the following things have to be done:
- The Report have to be designed using Jaspersoft Studio 6.20.0 or earlier.
-
Compiled report (*.jasper) with necessary resources has to be copied to src/mrowka/java/jasper directory. If there is no such package/directory create it using File menu.

Figure 5.
Folder for Jasper compiled reports and necessary resources
- The report has to be declared in the application configutration file mroovka.formica_cfg.
globals today date; reports mv_order(p_id oidn); mv_productline; mv_sales; jasper Orders(p_id oidn); Products;
- The report has to be called using run_jasper_report procedure. The Orders form of the demo application has the following BUTTON_PRESSED trigger:
format text(10); begin format ='pdf'; post; if not success then return; end if; if :PRINT.KIND='D' then if :ORDERS.ID is null then message_error('Please select order to print'); return; else run_jasper_report(Orders, format, :ORDERS.ID); end if; else run_jasper_report(Orders, format, null) base_block ORDERS; end if; exception when others then message_error(ERROR_MESSAGE); end;
It has two calls of the procedure. The first call executes the report passing the :ORDERS.ID parameter. This prints a single Order. The second call uses base_block phrase. This phrase informs the system to pass p_where and p_order parameters. p_where contains SQL boolean expression (WHERE phrase) that was used lately to process the query in the Orders block. p_order passes ORDER BY phrase used lately to process the query in the ORDERS block. Both have java.lang.String datatype.
You can use the parameters to design your report query (or anywhere in your report design). The p_id parameter (:ORDER.ID) goes to p_id report parameter. This is how your Jasper query looks like:
SELECT "ORD"."ORDER_NUMBER", "ORD"."ORDER_DATE", "ORD"."REQUIRED_DATE", "ORD"."SHIPPED_DATE", "ORD"."STATUS", "ORD"."COMMENTS", "ORD"."CUSTOMER_NAME", "ORD"."CONTACT_LAST_NAME", "ORD"."CONTACT_FIRST_NAME", "ORD"."ADDRESSLINE1", "ORD"."ADDRESSLINE2", "ORD"."CITY", "ORD"."STATE", "ORD"."POSTALCODE", "ORD"."COUNTRY", "ORD"."SALES_REP", "ORD"."ID" FROM "ORDERS_V" "ORD" WHERE $P!{p_where} AND ("ORD"."ID"=$P{p_id} or $P{p_id} is null) ORDER BY $P!{p_order}
When designing report parameters, choose appropriate datatypes according to the table bellow:
- Call paramater datatype
- Report Parameter dataType
- text
- java.lang.String
- etext
- java.lang.String
- number
- java.math.BigDecimal
- oidn
- java.math.BigDecimal
- date
- java.sql.Timestamp
- boolean
- java.lang.Boolean
CloudaIDE supplies itself two parameters meant to help with file locations:
- BaseDir – java.lang.String contains the directory path to the root of directory, that contain resources from src/mrowka/java/jasper directory. The path has file separator of the runtime Operating System. It is useful when referring to report resources. It is useful when referring to report resources like for example subreports. So in the demo application Orders report the Details subreport should be reffered as $P{BaseDir}+"Details.jasper".
- BaseDirFile – java.io.File contains abstract filename of the root of directory, that contain resources from src/mrowka/java/jasper directory. It is useful when referring to report resources.
The "format" parameter of the run_jasper_report can be one of pdf, html, xls, xlsx, rtf, odt, ods, docx, pptx.
CloudaIDE Jasper Reports runtime has Liberation Sans, Serif and Mono fonts installed. They are registered also as Arial, Times New Roman, and Courier New fonts. So if your design uses those Microsoft fonts – Liberation fonts will be used instead. Dejavue fonts are also available.Context parameters
The context parameters pertain to application state. They are sent to the application server to be ultimately used on the database server in SQL or stored procedures. They usually contain such values, that seldom change. The example is a business unit ID, on what the session operate.
To access a context variable in the database-side code use:
- In FirebirdSQL
- RDB$GET_CONTEXT('USER_TRANSACTION', <varname>)
- In PostgresSQL
- current_setting('mroovka.<varname>')
- In MySQL
- @<varname>
- In Oracle
- SYS_CONTEXT('MROOVKA', <VarName>);
- In Teradata
- Select var_value from Mroovka_context_vars where var_name='VarName'
- In MS SQL Server
- session_context(N'<VarName>')
You declare the context variables in the mroovka.formica_cfg configuration file.
CloudaIDE itself declares built-in context variables before running any database request.
The developer should be aware, that CloudaIDE uses connection pooling and does not clean context parameters on giving connection back to pool. This is for the sake of performance. Because of this the application has to set all context variables (at some point) before using them in server code. Otherwise an application can meet garbage context variables from other sessions and take them as own. Especially application should not test on the server if the context variable was set or not, because the variable could be set by other session. Application should check only the value of the context variable that was set by itself according to it’s logic.
Global variables
Global variables can are client side variables. Their values can be read and set by any application trigger. Global variables can be of any datatype. They are declared in the application configuration file.
User Authentication
CloudaIDE application runs always through a connection of a user specified in the configuration. This is a consequence of connection pooling. Individual users that connect to the application can be authenticated using one of the following mechanisms:
- Table
- Cloudaide maintains a user table. The table contains information about user identity (login) and password used in this mechanism. A user can register using user self administration application. To fully register the user enters data and receives (through e-mail, if the e-mail server is configured within Administration application) a special link to confirm identity. To activate the user the administrator has to manually check the 'Active' checkbox within administration application. Since then the user can access the applications that use Table and CAS authentication mechanism. If a user logs on to an application, calling the same application from another browser tab does not require authentication.
- CAS
- CAS authentication uses the same data as Table mechanism, but is slightly more convenient. It requires some skills to configure. CAS authentication makes it possible to do single authentication to many applications. If the user logs on to any of the CAS server authenticated applications, it is authenticated to other applications managed by the server so no authentication to other applications will be required.
- Database
- In the database authentication mechanism the user has to be entered by the administrator into the users table. The login must match the database user name. The user authentication is based on the user password in the database system. This authentication method is suitable for legacy systems.
- Default User
- The administrator can choose Default User authentication to disable password check and force the system act as though the user specified in the configuration application as default user logged in. This mechanism is suitable in the development environment or when the system is configured to run on a (otherwise protected) desktop.
- None
- No authentication is carried out.
If the application is not registered then it's authentication mechanism is None.
Upon a session creation two Context Variables are set:
- SESSION
- the user session number. It is unique in all the system history.
- USER
- user id of currently logged in user. I the authentication is None – the USER value is null.
Logged user data should be accessed from MROOVKA_CURRENT_USER view that contains one row. This data differs from the database user data. Database user identity is the same for all the application sessions and it’s use in a CloudaIDE application does not make sense. If the CloudaIDE user is not logged in (authentication None or outside the CloudaIDE session) this view does not contain rows.
All sessions after a login have separate state parameters. If a user calls an application in another browser tab it will be logged in under the same identity as the first login, but with separate browser session state. It means that user can work with the application in different places using different browser tabs. Tearing off tabs gives the possibility to see simultaneously different application sessions. Pressing log-out button logs out the user from all sessions dependent on the first login.
Timers
The CloudaIDE delivers the possibility to use timers. To create a timer use create_timer built-in.
The first parameter is the timer name, the second is time in miliseconds and the third is repeat option. If true then the timer will repeat.
To destroy (and stop) the timer use destroy_timer built-in.
The parameter is the name of the timer.
At the moments determined by the timers the TIMER_EXPIRED trigger is executed. Within this timer the timer_name() function can be used. It returns the name of currently executing timer. Outside the TIMER_EXPIRED trigger the function is not usable and returns random values.
Timers are destroyed automatically after the form they are defined in is closed. Also take into account that TIMER_EXPIRED processing never blocks screen waiting for response from asynchronous calls. To differentiate behavior of the timer depending on whether the current form is displayed (on top of the stack) use is_form_visible() function.
Java Gateway
The programmer can invoke Java on the server through a Java Gateway. To do so the programmer should declare a Java procedure call in the configuration file. For example:
Next he/she has to write a static Java 'message' method in the declared 'org.cloudaide.cru.server.Procedures' class.
Next the procedure can be called from a trigger:
As a result of this trigger the following message will be displayed:
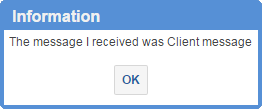
Figure 6.
Message displayed as a result of trigger
The method signature has to conform to the procedure signature. The rule is that:
- text and etext MT datatypes conform to Java strings
- number and oidn datatypes conform to Java java.math.BigDecimal
- date conforms to java.time.LocalDateTime
- boolean conforms to Java Boolean
Every "in out" parameter has to be passed as the first array of respectable datatype elements parameter. This is done to make parameter mutable.
At the end of the parameter list there can be also an optional JavaArg parameter. This parameter is used to pass the information about the evironment in which te method runs. It's methods include:
- getConnection - returns open database connection which the method can use to access database data
- getServletRequest – returns the current HttpServletRequest (don't forget that CloudaIDE uses Java Servlets)
- public void logError(Throwable e) - logs stacktrace of e in server log text files and database MROOVKA_LOG table
- public void logError(String message) - logs message in server log text files and database MROOVKA_LOG table
JavaScript Gateway
The programmer can interact with JavaScript on the client through Javascript Gateway (JSG).
HTML id
Cloudaide Screen Objects have "HTML id" property. This property can be set for every object, excluding those, laid in a TableBox. The purpose of the property is to make easy to refer to Html DOM element by id. It has to be unique within a form. If an Item has a label then the item receives id specified in "HTML id" property, and the label receives id with appended "-label" suffix. For example an Item with "name" id have set name for a "input" element and "name-label" for the label element. If a grid Cell contains an Item, then the item is hold in two "td" elements. One for a label and second for the widget. Similarly to Item, the cell (with Html id equal "cell") containing label label will hold “cell-label” id and the cell for widget will hold "cell" id. The forms are laid on a so-called “Form Panel”. It is a div element. The framework assigns “wpt-form-panel” id to it to make it accessible from within Javascript.
HTML Attributes
Cloudaide Screen Objects have "HTML Attributes" property. This property can be set for every object. The property lists on separate lines HTML attributes and their values separated by =. Notice that values are not sorrounded with quotation marks.
The values of the properties can be internationalized just like Multilingual Messages http://cloudaide.org/programmers-guide.html#multi_lingual_messages.
In the default I18nMessages.properties put:
and in the Polish I18nMessages_pl.properties put:
Additional Class
Cloudaide Screen Objects have "Additional Class” property. This property can be set for every object. You can put there CSS class name to refer within CSS scripts.
API supplied CSS classes
wpt-centered css class can be set to vertically center element content.
To make all forms on the Canvas vertically and horizontally centralized the following trigger can be used:
Calling JavaScript from MT
The main element of the Gateway are native procedures. Native procedure declaration consist of a header and special comment, containing Javascript code.
When accessing the browser’s window and document objects from JSG, you must reference them as $wnd and $doc, respectively. Your compiled script runs in a nested frame, and $wnd and $doc are automatically initialized to correctly refer to the host page’s window and document.
When calling a native procedure the programmer has to supply two text parameters.
The first text argument of the native procedure call is referenced within native procedure using clInput name. The second parameter is used by the JSG supplied success function to set the output value. The clReturn method returns the control to the MT code. It is neccesary to use it because it has necessary means to resume MT code. It can be passed to an asynchronous routine (AJAX for example) that has to call it to resume MT processing in some future moment. Terminating the native procedure without calling clReturn fuction does not resume MT procedure. The code above in this case would not display CloudaIDE message and would cause a memory leak. It also can hang the UI.
Function clReturn also returns a text value to the calling MT code. For a historical complatibility reason there is also clSuccess function available, which is a synonym of clReturn.
When running the above BUTTON_PRESSED trigger the browser alert will be displayed
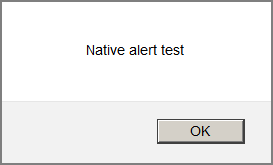
Figure 7.
Native alert test
followed by the CloudaIDE message window.
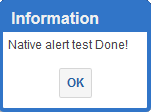
Figure 8.
Native alert test done
To specify additional scripts use configuration file.
When manipulating CloudaIDE items from JavaScript take into account that it is safe to manipulate single row (control) block items and HTML areas because they are never refreshed from block backing store. Otherwise changes made by the JavaScript will cease after refreshing item from the backing store.
Calling MT procedures from Javascript
The JSG lets also to call a MT language procedure from JavaScript. To do so the programmer has to use cloudaIDE.run JavaScript function. It has the following parameters:
- Procedure name
- CloudaIDE procedure name to call. The procedure has to have the special following signature (clInput text, clOutput in out text);
- Input parameter
- String input parameter passed to the MT procedure in the clInput parameter.
- Form
- the CloudaIDE form reference. The reference can be obtained within any native procedure as clForm variable.
- SuccessCallback
- a callback function. It is called only after the MT procedure exits. Using it is the only means to obtain the clOutput MT procedure parameter. Some MT procedures have hidden asynchronous nature. Among them are Stored Procedures Calls, Java calls, database block dml operations, mesagebox displays. Those procedures return the control to the JavaScript immediately after the asynchronous call is issued, before completion of the whole procedure. In such a case to assure that the further processing takes place after the completion it is necessary to use SuccessCallBack.
- FailureCallback
- a callback funcion to obtain failure result. Failure result is a JSON string with the following properties:
- CODE – string with the CloudaIDE error code number
- TYPE – string containing CloudaIDE error type
- MESSAGE – string containing CloudaIDE error message;
The both callback functions have to have a single parameter, that contains text returned from the MT.
Let us have two procedures
One native. It calls the MT cloudaide_message procedure. In the callback it resumes the caller (clReturn).
The second one is a MT procedure. It displays the first argument and sets a response (clOutput).
and a trigger that calls the native procedure and displays response from it (from the callback).
After clicking the button two messages will be successively displayed.
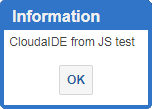
Figure 9.
CloudaIDE from JS test
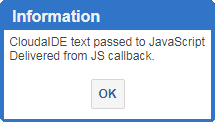
Figure 10.
CloudaIDE text passed to JavaScript Delivered from JS callback
Internationalization
The framework provides two means to support internationalization: locales and multilingual messages.
Locales
The list of available locales is set in the configuration file of the application mroovka.formica_cfg. The description of the file can be found on Configuration File Syntax. The locale used by a client is determined by the browser or by specifying an URL parameter "locale" e.g. http://cloudaide.org:8080/dem/?locale=he to specify Hebrew locale. The value of the locale determines the language of the system messages and the language of multi-lingual application messages and other locale-specific features. Initially the framework contains system messages in English, Polish, Spanish, Hungarian and Indonesian languages. The distribution root directory contains English FormMessages.properties file. You can translate it and convey it to CloudaIDE so that your translation could be included into future releases. Please encode your file in utf-8. Append ISO code of your language to the file name e.g. FormMessages_it.properties for Italian translation or FormMessages_he.properties for Hebrew translation.
If you want to test it you can put your modified properties file(s) into src\main\webapp\WEB-INF\lib\mroweczka.jar archive into pl\mroweczka\forms\client\i18n catalog of a project and use it since then in the application. But much better idea is to send it to us to share with the world. If you don’t do it – you will have to include it in every new application, and after each upgrade.
Multi-lingual Messages
To create multi-lingual application messages create a message file I18nMessages.properties in the I18nMessages directory, containing the messages for the default language, and I18nMessages_[locale].properties files for the other languages, e.g. I18nMessages_de.properties. An example default message file (from the demo application) follows:
Below comes the contents of the I18nMessages_pl.properties file with the Polish translations:
The programmer can refer to the multilingual messages from within the framework by specifying multilingual text property in the Screen Designer or using i18n_message API function in MT. To specify multilingual text property the programmer specifies the message identifier, prepended with hash(#) in the respective property field. For example #orders_button as the label for the orders button.
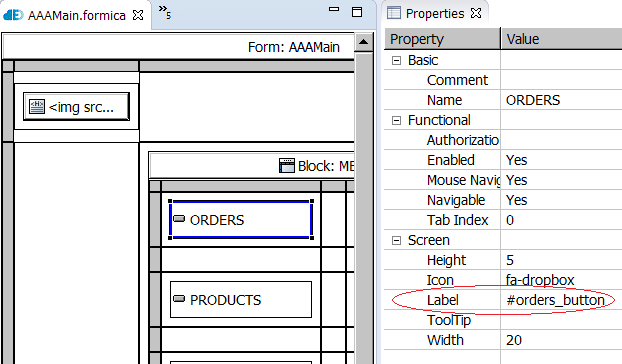
Figure 11.
Multi-lingual text property
The message identifier follows the same syntax rules, as the other MT identifiers.
To specify a multi-lingual message from within the code the programmer uses i18n_message function.
If the default language properties file (I18nMessages.properties) contains the following message declaration:
and the Polish language properties file (I18nMessages_pl.properties) contains the following message declaration:
then
where today_is – message identifier, sysdate – parameter will for the default locale (if English) will contain:
and for the Polish locale:
In braces there are placeholders for the function arguments, that follow message identifier in the API call (in this case – sysdate). In the first case (default)– only argument index was used, and in the second case argument index and (optional) argument type and argument style were used.
For full syntax of the international message properties file consult Java or GWT documentation. The very good reference about message localization can be found on https://jenkins.io/doc/developer/internationalization/advanced-localization/.
Take into account, that the CloudaIDE message properties file are (have to be) UTF-8 encoded.
Take into account that the choice pattern of MessageFormat does not work on the client. As of now you can implement this using server-side messages through the Java Gateway. The plurals are not yet implemented.
Project structure
CloudaIDE project uses the following catalogs:
- Java source files and resources. All server Java resources that when compiled go to webserwer
- CloudaIDE forms
- Webserver resources. As you can guess, all the src/main/webapp directory gets copied to the webapp application
- The compiled application is created in target/App-0.0.1-SNAPSHOT directory
Contents of points 1, 2, 3 and 5 are preserved between upgrades.
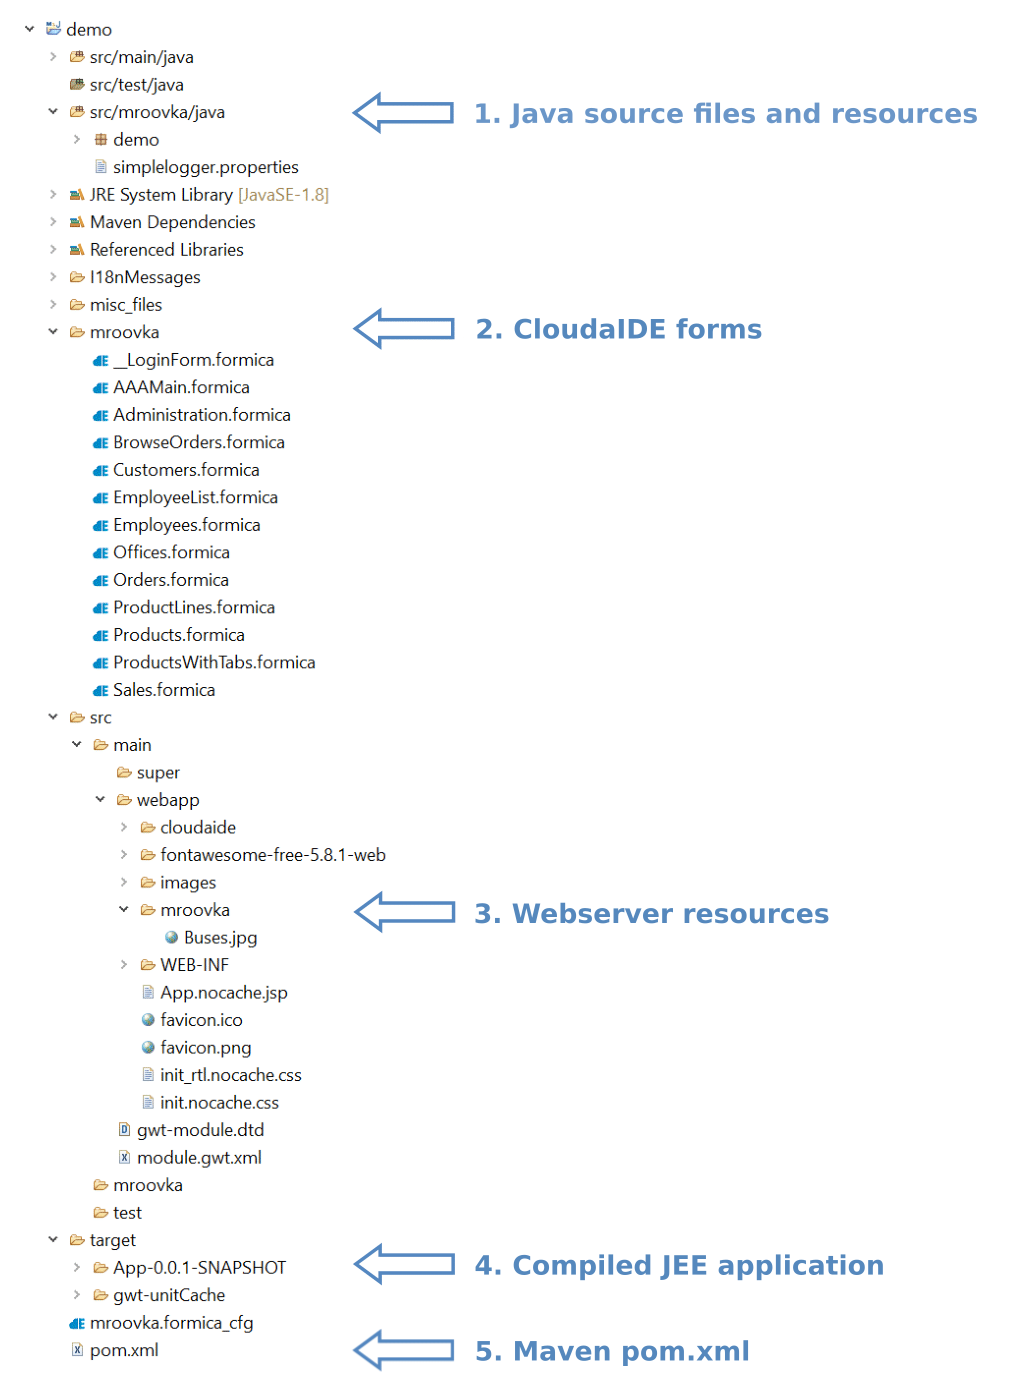
Figure 12.
Project structure
Form Elements
Layout elements
CloudaIDE provides two basic layout elements: the grid and the table.
Using the grid the developer can freely place other elements on the form.
Using thetable the developer can place the other elements in a rectangular table with labels on top.
CloudaIDE lets also place any item "outside" the screen. Such Items are called off-screen items. They are never displayed.
Grid
Grid is a tool to automate layout of other elements according to theirs sizes and layout recommendations.
To create a grid use a Tool Palette. Click the grid tool then click on an empty cell inside a grid, that is already present on the form. Or you can drag and drop the grid directly from the tool palette to the empty target cell.
A grid is a rectangular area containing cells organized into rows and columns. The cell can contain at most one element, which can be a grid. The grid has gray column handles on top and the row handles on the left side. After the creation you can manipulate the grid.
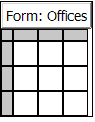
Figure 13.
Grid
Basic Grid Operations
Inserting/deleting row/column
In order to insert a row into a grid, select a row handle, right click the mouse and select the Insert ➜ Row Above or Row Below option.
To delete the row select Delete option.
By the analogy columns can be inserted/deleted.
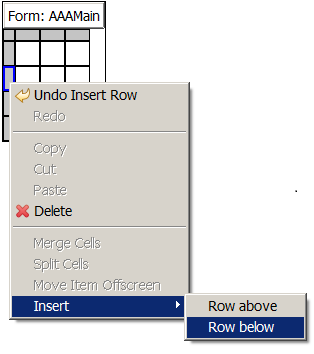
Figure 14.
Inserting row
Merging/Splitting cells
Sometimes it might be useful to merge grid's cells. To do it shift-click on consecutive empty cells of a single row/column. Next right click on the selected area (with blue borders). Select Merge Cells option.
To merge m*n cells rectangle (seldom needed) merge m, n cells rectangles.
To split merged cells, select the cell to split, right-click it and choose the Split Cells option. The element in the cell will be moved to upper left cell of the split result.
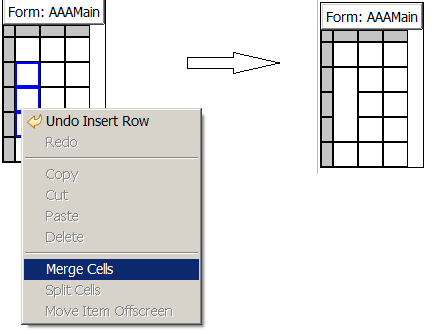
Figure 15.
Merging cells
Vertical/Horizontal Cell Alignment
To align vertically or horizontally the element inside the cell, select the cell and set the "Vertical Alignment" or "Horizontal Alignment" property respectively.
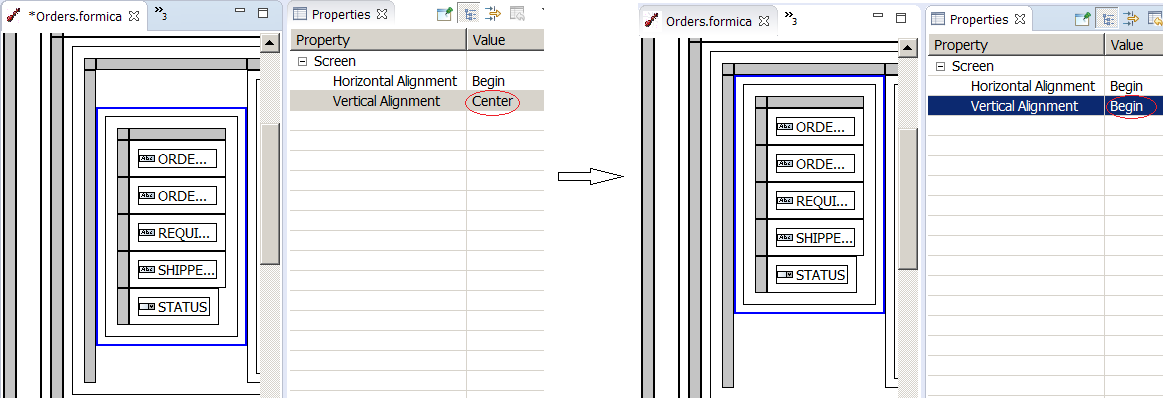
Figure 16.
Setting vertical cell alignment
Height of a row/width of a column
To set height of a row select the row handle. Set "Height" property. The property is expressed in HTML ex units. The width of a column can be changed by selecting the column handle and setting the "Width" property.
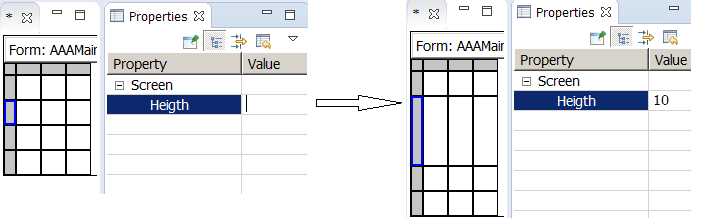
Figure 17.
Setting height of a row
Table
The table provides tabular layout for items. There can be only one table per a block. The programmer can place items in the table widget and reorder those using drag and drop. By default the cursor navigates from left to right. The table can be created using the Tool Palette and then can be populated by items.
If the owning block has set the "Fetch All" property to true then numerical textboxes inside a block receive "Has Summary" property. By setting it to true, the textbox will be summarized.
The default block items navigation starts from the first item of it's table element.
Database Items in the Table element can be used to specify by the user an ad-hoc order of the rows by clicking the column name. The order circulates None-Ascending-Descending. By consecutively specifying (by clicking) the order of several columns a multi-column order can be specified.
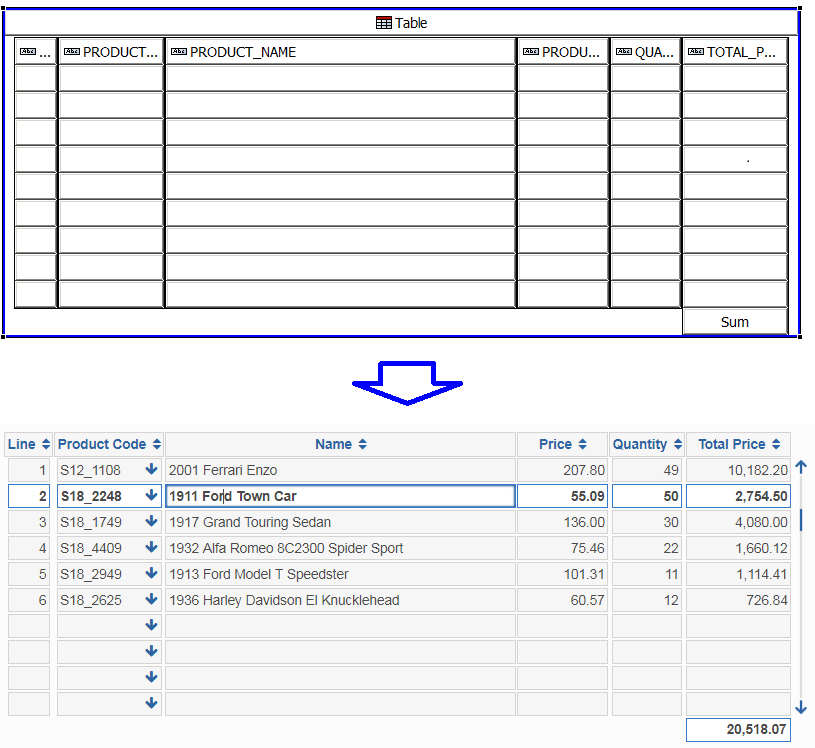
Figure 18.
Table
Off-Screen Items
Sometimes the application needs to keep an item hidden from the user view. The most typical item is a database row ID. This is where the developer should use an off-screen item. The off-screen item is an ordinary item, which is never displayed. To display off-screen items display the Outline View and navigate to off-screen items branch of a block subtree.
To move an off-screen item onto a form drag and drop it into desired location. It will be relocated to the closest enclosing block.
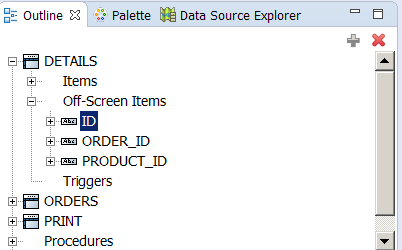
Figure 19.
Off-screen item in the Outline View
To move an item off-screen use a context menu Move Item Offscreen option.

Figure 20.
Moving item off-screen
Blocks
The block is a rectangular area on screen to display the data from a single unlimited array of records. Records consist of items such as textbox, textarea, listbox, checkbox and HTML area. The items of a block appear inside the block grid – the primary block layout element. The block layout can be nested. An item belongs to the smallest enclosing block records. You cannot put an outer block item into inner block grid. Putting a block inside another block alone does not impose any linkage between the blocks data. It does not establish master-detail relationship in particular. To make such arrangement the "Master Item" property of an item should be used.
A Block can be database or control. The Database block is to interact with the database tables and views, whereas a control block doesn't have a direct link to the database data.
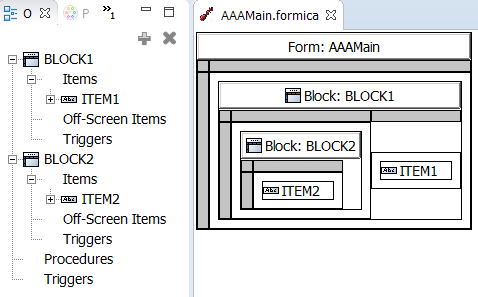
Figure 21.
Nested structure of blocks
Database Blocks
The database block interacts with the database tables. It performs all the operations to create, retrieve, update and delete database rows. It also implements Query By Example mechanism. To get the functionality the programmer does not have to write any code.

Figure 22.
Database block
The properties are:
- Database Block
- To make a block database the “Database Block” property has to be set to Yes. A database block has to have an ID item that corresponds to a numerical single column primary key column of the basic DML table. This item will be always given oidn datatype to prevent entity attack.
- Block Name
- This is the block name. Through this name the client refers to the block and it's items. This is also the default for the values of "Query Table Name" and "DML Table Name" properties.
- Query Table Name and DML Table Name
-
The block interacts with the database through DML Table and Query Table. In the absence of the "Query Table Name" property the system assumes that the block queries the data from the table with the name equal to "Block Name" property. In the absence of the “DML Table Name” property the system updates the Query Table.
The Select Statements are directed towards Query Table and Insert, Update and Delete are directed towards DML Table. The Select Statement contains all the database bound Items. The DML statements (Insert, Delete, Update) are directed against all database Items, less queryonly Items. This arrangement gives the possibility to update only the updatable tables or views. For example In the Orders block of the Orders Form all the Items of the block are retrieved through the ORDERS_V view, and only the Items that are not queryonly will be updated in DML operations. So CUSTOMER_ID is the only Item with the CUSTOMER prefix will be updated. In general, all the looked-up columns of the view should correspond to queryonly Items. The CUSTOMER_NAME, CUSTOMER_CITY, CUSTOMER_ADDRESSLINE1, CUSTOMER_ADDRESSLINE2, CUSTOMER_STATE, CUSTOMER_POSTALCODE, CUSTOMER_COUNTRY will never take part in any DML operations, because they are derived (looked-up) from the CUSTOMERS table using CUSTOMERS_ID Item column. The only columns that can be updated are the ones, that come from the ORDERS Table, from which the ID Item comes directly or indirectly.
Simple (like TABLE_NAME) and qualified names are supported, like DATABASE_NAME.DOMAIN_NAME.TABLE_NAME. There is no depth limit on the qualification level. During the processing Cloudaide adds quotes. The first name will be sent to the database as "TABLE_NAME", and the second "DATABASE_NAME"."DOMAIN_NAME"."TABLE_NAME". If the property starts and ends with quotes, then CloudaIDE does not add quotes itself.
- Alias
- This is a SQL alias for the table. It is sometimes necessary to give an alias for the table in order to prevent or resolve naming conflicts, that can happen when a particular table is used in a query multiple times for example if the where phrase correlates with the same table.
- Batch size
- CloudaIDE fetches rows from the database in batches. If the client requests more rows than it has in his buffer, an additional SQL select statement is executed on the server for the missing rows. The query request additional batch with record numbers higher than last fetched row according to the SQL "ORDER BY" clause. Because of such splitting system does not garantie consistency for the buffer replenishments after the first batch. To increase the consistency raise the batch size value. The price for it is the network bandwidth.
- Default Order
- Every database block has to have set a "Default Order" property. The data from the database comes in batches. Every batch consists of constant amount of rows. To fetch the rows the system issues a query to fetch rows within particular range of row numbers. The calls have to deal with the rows always coming in the same order. If no visible column combination can warrant this, append the ID column at the end of the phrase. Take into account that in the "Default Order" phrase you have to use column names, not the item names. The order can be also changed using set_order built-in.
- Default Where
- This property serves a purpose to limit a result data to the values conforming to the "Default Where" property. The string can reference global variables, form parameters and block items.
- Fetch All
- This property set to "Yes" tells the system to fetch all the data in one go from the point view of the user. This enables the system to calculate sums of numeric item values in table layout element. If set to "No" the data is delivered progressively to the client as the user browses the block.
- Query Allowed
- If this property is set to "No" the user will not be able to query the block.
- Authorization
- The name of the authorization function. If upon the block creation the authorization function delivers 0 then the block will not be created.
- Delete Allowed
- If this item is set to "No" then the user will not be able to delete the row using the block.
- Delete Confirmation Text
- If not empty, then the user will be asked the question and the system will delete the row if the user confirms the message.
- Insert Allowed
- If this item is set to "No" then the user will not be able to insert a row using the block.
- Locking Mode
-
Locking mode can have two values:
- Last in wins – the system performs the operation, discarding other users changes.
- Optimistic – upon the query the system calculates a digest of the delivered row, if on the update the digest is different the user is forced to refresh the record and to reenter the changes.
- Navigation Style
-
The property tells what is the next navigation item of the last navigable item in the block and the next item is not set for the item. It can have one of three values:
- Next Block – the cursor goes to the first navigation Item of the next block,
- Next Row – the cursor goes to the first navigation Item of new row the block,
- Same Row – the cursor goes to the first navigation Item of the same row (circulates record).
- Next Block and Row – the cursor goes to the next row of the next block. This setting is useful in the detail block to navigate to the next row of master block to start entry of a next master. To enter the next row of the detail the user will have to press the Down Arrow& key on the last item.
- Next Block
- The property sets the next block in the "Next Block" navigation.
- Scrollbar
- If set to "Yes" the block will have a scrollbar located at the right side of the block, or the right side of the block table if the block owns one.
- Single Record
- If set to "Yes" declares that the block is a single record control block.
- Update Allowed
- If this item is set to "No" then the user will not be able to update a row using the block.
- Caption
- A text to display as block caption on screen
- Decoration
- If set to "Yes" the block will have decoration (borders, margins) elements making the block to stand-out on the screen.
- Rows Displayed
- Declares the number of rows that the blocks table will display on the screen.
- Coordination Style
- This property tells the system how to query a detail block if a master record changes. If set to "Automatic" then on every change the detail block is queried. If set to "Deferred" the dependent block is cleared on the master change the query is performed only when the cursor enters the detail block. If set to "Manual" the dependent block is cleared on the master change the query is performed only when it is executed directly from the ui or programmatically.
- Instead of DELETE
- This property can have a special value "never" that forbids deleting row of the block independently of other settings. In other case the programmer can enter a name of a single numeric parameter procedure that replaces standard SQL delete statement on the blocks DML table.
procedure dekr_delete(p_id number) is z_master_id number; begin z_master_id := fetch(p_id).id_nag; master_lock(z_master_id); delete from mr_poz where id = p_id; end;
- Instead of INSERT
- This property can have a special value "never" that forbids inserting row into the block independently of other settings. In the other case the programmer can enter a name of a procedure that replaces the standard SQL insert statement into the blocks DML table. The procedure signature has to have parameters for every non query only database or primary key item of the block. The name of the parameter should be equal to the name of column prefixed with the "Parameter Prefix" value. The parameters corresponding to automatic primary key columns values have to be output, and remaining parameters should be input.
procedure poz_insert(p_id out number, p_data_operacji date, p_line number, p_amount number, p_account number, p_master_id number) is begin master_lock(p_master_id); insert into mr_poz (data_operacji, line, amount, account) values (p_data_operacji, p_line, p_amount, p_account) returning id into p_id; end;
- Instead of UPDATE
- This property can have a special value "never" that forbids updating row of the block independently of other settings. In the other case the programmer can enter a name of a procedure that replaces the standard SQL DELETE statement of the blocks DML table. The procedure signature has to have a input parameter corresponding to every primary key item of the block. The Parameters of the procedure bind by position (have the same order) as primary key columns listed in the property.
procedure poz_update(p_id number, p_data_operacji date, p_line number, p_amount number, p_account number, p_master_id number) is begin master_lock(p_master_id); update mr_poz set data_operacji = p_data_operacji, line = p_line, ammount = p_ammount, account = p_account where id = p_id; end;
- Parameter Prefix
- Parameter Prefix parameter prefix is a string that is prefixed to column names in instead od Insert and update procedures. It's purpose is to solve name clashes problems when a database column name is equal to parameter name in the same SQL statement. Let us assume that te Paramater prefix is "P_". The paramater "P_COLUMN1" corresponds to "COLUMN1" column of the DML Table.
- User Sortable
- Lets set items in the block as user sortable.
- Primary key column(s)
-
Comma separated list of database table column names (not Items). Each column name can be followed by “manual” keyword. e.g "order_number, order_kind manual". Values of the columns marked by "manual" keyword are entered by the user, or calculated by the client triggers. Other (automatic) values should be calculated on the database server.
Primary keys are used by CloudaIDE to bind rows on the client with database tables (make possible to access database from database block). They are also used as the default sorting of the block rows, if there is no other order specified. The last is the reason to put the columns in the same order as the database table primary key to avoid unnecessary sorts.
CloudaIDE is strongly convinced that the best method is using surrogate keys with automatically populated number values. Such keys should have oidn datatype to make malicious data access highly difficult. Nevertheless, to hold such a requirement can be very difficult in legacy software. So since 1.1.1500 we enabled multi-column primary keys. Older software written with use of the CloudaIDE is automatically converted and this property is populated with the names of primary key column, that corresponds to ID items.
Control Blocks
Control block are not bound to a database table. It does not have properties in the DataBase category. The special case of the control block is a single record block that can hold only one record. Block of this kind provides a facility to put control items. To make a block control block set the DataBase property to "No", or the "Single Record" property to "Yes".
Items
The block contains items. The items available in the CloudaIDE Designer are: textbox, textarea, listbox, HTML item, button, file upload, image, checkbox and password.
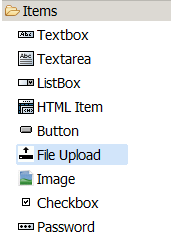
Figure 23.
Items
Textbox
A textbox can hold a value.

Figure 24.
Textbox
It has the following properties:
- Database Item
- A database block can have database and no database utems. This property tells the system whether the item is bound to the database column.
- Name
- The Item name.
- AutoQuery and AutoQuery Key Unique
-
Item behavior with "Auto Query" property set to "Yes" causes special processing on new rows. The processing depends on the setting of "Auto Query Key Unique" property.
"Auto Query Key Unique" is meant to be set to "Yes" on items that correspond to unique database keys such as stock numbers. After entry of a value, that is equal to column in the database row, the row is fetched to the block and the row is will further behave as a queried row so the row will not be reinserted.
"Auto Query Key Unique" is meant to be set to "No" on items that correspond to non-unique identifier value such as VAT numbers. In most countries the company branches share the VAT number (without any branch suffix). In this case after the entry of a value the previous record item value is checked. If it is equal to the current row value then no further autoquery processing occurs. The system assumes that the user has fetched the records with the key value and none satisfied him/her.
In the other case the system look-ups the key value from the database. If nothing has been found, the autoquery processing stops. If some rows had been found then the user is asked, whether to display the fetched rows, or not. If answer is "Yes" then the rows are displayed and the rows will behave as old-fetched rows. In the other case the normal new row processing continues.
To process data with the "Auto Query Key Unique" set to "No" the Duplicate Item key is very helpful, because the user can copy a value from the previous row to the new one without the need to retype it.
- Column Name
- The name of the database corresponding column. If empty then the system reaches the column. Use it when necessary. For example in the list of values items, that are bound to the list using naming convention. Also can be useful when the ID item corresponds to a column with different name.
- Ignore Case
- The property states whether queries on the item's column will be case insensitive.
- Query Allowed
- If the property is set to "Yes" the user will be able to enter query criteria into the textbox.
- Query Only
- It the property is set to "Yes" the item will not take part in DML operations (insert, delete, update) on the server.
- Returnable
- If the property is set to "Yes", the item column value will be fetched back into the item after each DML operation. When the Framework inserts or updates a row sometimes some database triggers fire and some items are also dependent on other items (e.g. in views). The items that are changed by database triggers (or derived via views) can be marked as returnable. Look on next order number calculation in the demo Order Form and you will notice that the ORDER_NUMBER is marked as Returnable. The order number is calculated by a insert database trigger and after all triggers fire it is brought back to the ORDER_NUMBER Item automatically whithout programmer intervention. This remainds the INSERT... RETURNING and UPDATE ... RETURNING DML operation. Using Returnable Items the CloudaIDE programmer has similar functionality in the UI layer.
- Case Conversion
- For the text values. One of three values: "None", "Lower", "Upper". The entered data will be converted to the selected case.
- Datatype
- One of four values: "Text", "Number", "Date", "Oid Number", "Encrypted Text".
- Date Picker
- For date items. If true the item has date picker (calendar).
- Default Value
- Value in normal format of the target datatype, or an item, parameter, global variable, or special string (":increment") to set the item value to the incremented value of the previous row item value (for numeric data e.g. invoice line number)
- Format Mask
-
Format mask appropriate for the datatype:
- Date – a mask following Java SimpleDateFormat convention. In the absence of mask the yyyy-MM-dd mask is used.
- Number – a mask following Java NumberFormat convention. In the absence of the mask the value is displayed with a mask "#,##0.0000", where the number of the zeroes after the dot is equal the precision of the item. This mask displays values with localized thousands and decimal separator.
- Text – The format string is a sequence of characters. For example 999"-"999"-"99"-"99 is a format mask for the polish VAT number. Every format character, that be literally inserted into formatted text should be enclosed into double apostrophes. Outside the double apostrophes there can be only 9 and A characters. The A character is to by replaced by any letter and 9 is to be replaced by a digit.
- Has Summary
- The property can be set on a numeric database item to display total of the column. It appears on the property sheet only when the “Fetch All” of the Block containing the item is set to "Yes".
- Insert Allowed
- If the property is set to "Yes" the user will be given the possibility to enter item data in new records.
- LOV Call
- The name of the form used as a supplier of data for the item with possible parameters: FormName [,parameter]* example: Employees,:DEPARTMENT.ID
- List Validable
- The property shows up when the "List of Values Form" property is not empty. It tells the system to validate the item using the list of values form. The value of the item has to come from the List of Values.
- Master Item
- "Master Item" property has to be set to establish a master-detail relationship between blocks. The master item is copied into new rows and is used when querying a database for detail rows. The system allows for multi-master, multi-detail, multi-level relationship between blocks. The master-detail key can be multipart.
- Matching
- Determines whether the search criteria for the item is "Contains" or "Starts With". The last one criteria is convenient for account, parts and VAT numbers and similar symbols.
- Maximum Length
- Maximum length (in characters) of the displayed item value.
- Max Value, Min Value
- Maximum and minimum item values. The values can be in normal format of the target datatype, or an item, parameter, global variable reference (eg. :global.today).
- Navigable
- Cursor will not visit an item with the property set to "No" during normal (mouseless) data entry.
- Precision
- Number of digits, that the numeric value can hold.
- Required
- The data entry has to have a non-empty value.
- Scale
- The number of digits after the decimal point.
- Tab Index
- A number driving the navigation sequence of items in a block. Items are navigated in ascending order of "Tab Index" values.
- Update Allowed
- If the property is set to "Yes" the user will be given the possibility to update item data in old records.
- Label
- HTML text to display as an item label on the left side of the item, or above block table item column.
- Tooltip
- A tooltip to display near item.
- Visible
- Determines whether the item is visible. Can be set programmatically.
- Width
- The width of the item expressed in HTML "ex" units.
- Text Alignment
- In case of text datatype textbox programmer can select one of the following values:
- Default – This setting has different behaviour depending on bidirectional enablement of application. When the application is bidirectional (one of supported locales is right to left) the alignment depends on content of the textbox. When the ratio rtl/total words reaches 40% then the content is right aligned. Otherwise is left aligned.When the application is not bidirectional, text is left aligned.
- Left
- Right
- Center
- User Sortable
- Enables user sorts on the corresponding database column by clicks on column names of the items located in table layout element.
- Starred label
- When set to "true" the required item will be suffixed with "*". Setting the property to "false" disables this feature.
Textarea
The textarea displays and lets enter multi-line text. The item of this kind contains only text datatype values.
The properties are:
- Height
- It's height property expresses the height of the control in rows of text unit.
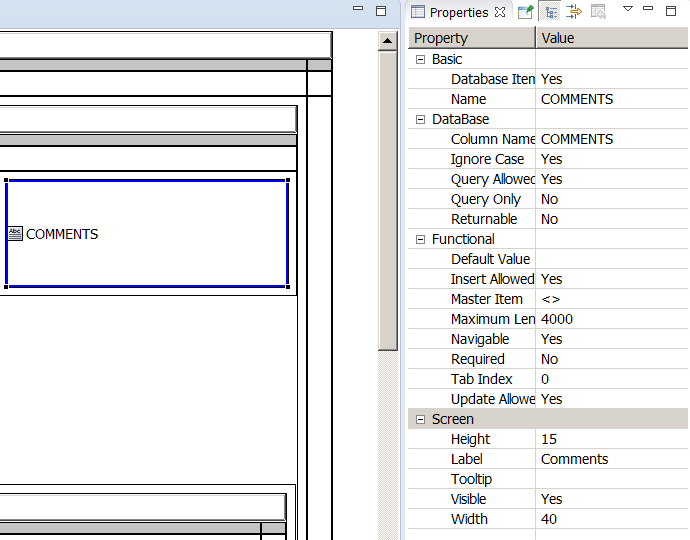
Figure 25.
Textarea
Password Textbox
Password textbox can be used to enter confidential information. It does not display any entered characters. It replaces those with browser dependent special character.
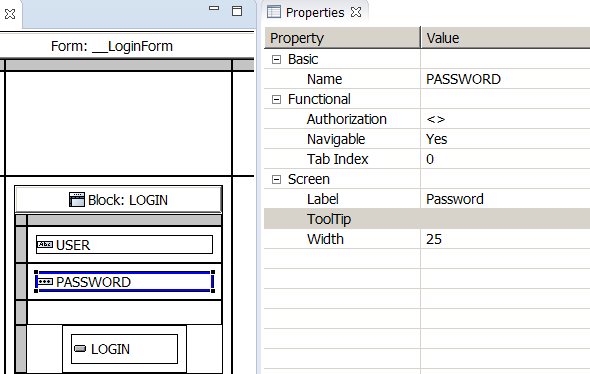
Figure 26.
Password textbox
Checkbox
Checkbox is used to display/edit one of two values. The properties are:
- Value Unchecked
- What is the value of a unchecked checkbox.
- Value Checked
- What is the value of a checked checkbox.
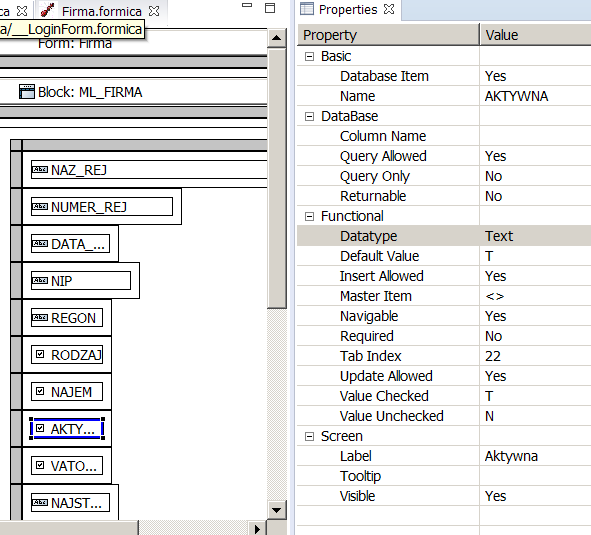
Figure 27.
Checkbox
Listbox
A listbox widget to select one of many text values. The properties are:
- Dynamic
-
If set to "No" then the "Value" property should be entered as comma separated pairs of text values, for example:
C,Cancelled,D,Disputed,O,Open,R,Resolved,S,ShippedIf set to "Yes" the "Value" property should be entered as a SQL select statement with two text select columns. For example:
Select CODE, NAME from VAT_CODES order by percent
The select statement can use Items, global variables and form parameters as binding variables. For example:
Select CODE,NAME from VAT_CODES where country=:global.country order by percent
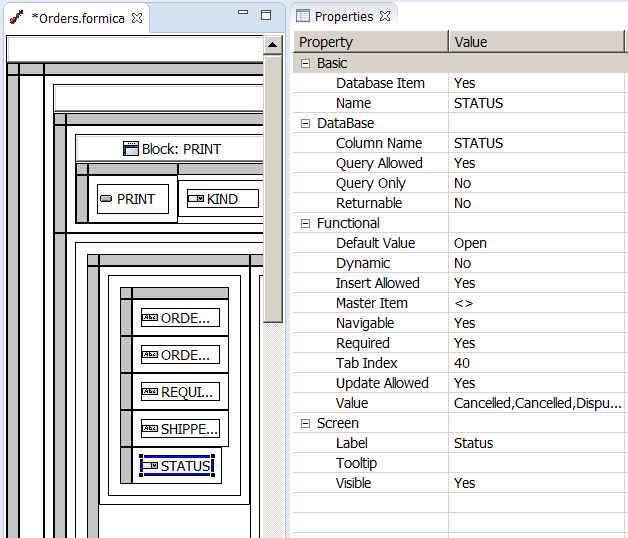
Figure 28.
Listbox
HTML Item
HTML item displays any HTML text, that is assigned to the item.
This kind of item can have broad range of applications. It is used in the download application for the beta CloudaIDE program.
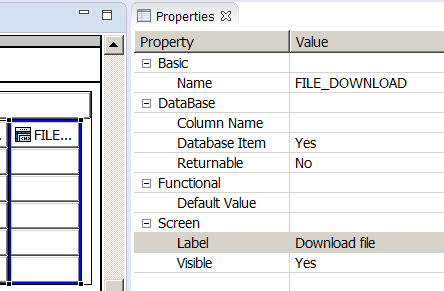
Figure 29.
HTML Item
Button
Button is an item to fire BUTTON_PRESSED trigger when pressed. The properties are:
- Mouse Navigable
- If set to "No" then the cursor never navigates to button. So no navigational (validation, updates to the datasets) events happen. Just the trigger fires.
- Height
- Height of the button expressed in HTML "ex" units. If the button is placed within a table element then you can set the property to empty value.This will align the height of the button with the height of the Table's row.
- Icon
- The Font Awesome icon, that will be placed before the Label. The same Icon will be placed in the menu option, that is based on this button. For the list of available icons consult http://fontawesome.io/icons/. Use icon names from the list. CloudaIDE uses free 5.8.1 version icons set. CloudaIDE first checks if the icon belongs to brands. If not, it assumes it is in solid set and calculates the classes accordingly. If you want to specify what set (brands, solid, regular) does the required icon belong you have to follow the Font Awesome documentation. For example I you use "square" icon name, CloudaIDE finds out, that it does not belong to brands and assumes that it is in "solid" set. It applies "fas fa-square" classes. If you want to specify that the icon is out of "regular" set you have to fully specify "far fa-square" classes in the icon property.

Figure 30.
Button
File upload
File upload is an item, that enables to upload file into the BLOB_COLUMN column of the MROOVKA_APP_FILES table. After the upload the system sets the value of :global.last_upload_id global oidn variable to the id of the row containing the blob. Also the system sets the value of the DOC_SIZE column to the size of the file (in bytes) and the CONTENT_TYPE to the value of the content type reported by the browser. The programmer can further process the dowloaded file using BUTTO_PRESSED trigger attached to the File upload Item. After the server session (subsession) expiration the row of MROOVKA_APP_FILES containing the blob is deleted. The MROOVKA_APP_FILES table is a temporary storage for uploaded files. The properties are:
- Name
- the name of the item.
- Label
- he label describing the upload.
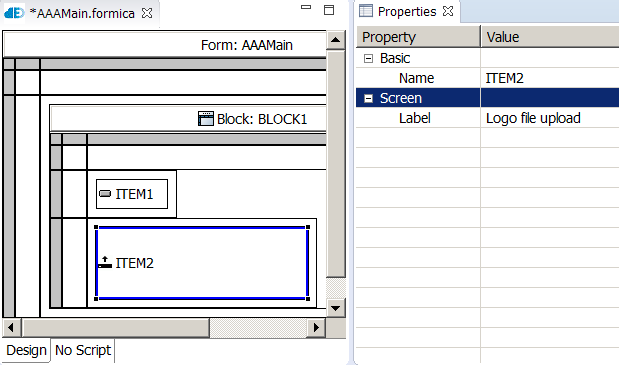
Figure 31.
File upload
Image/Object
An item (control) to display an image or object (video,audio,pdf) from a blob. The value of this item is encrypted (oidn) of the row containing the blob. The properties are:
- Name
- the name of the item.
- Column Name
- the name of the column containing the row id of the blob.
- BLOB Column Name
- the name of the blob column
- ID Column Name
- the name of the ID column
- MIME Column Name
- the name of the column containing the MIME type of the blob.
- Table Name
- the name of the table containing the blob.
- Height
- height of the control (pixels).
- Label
- the label of the item.
- Width
- width of the control (pixels).
- Content Type
- list of two values:
- Image Only – the Item will display an image in an IMG HTML element. Preferred over "Miscellaneous" when the item displays only images. Other types of content than images will not be dispalyed.
- Miscellaneous – the Item will display any type of contents (pdf, audio, video and images) in an OBJ HTML element.
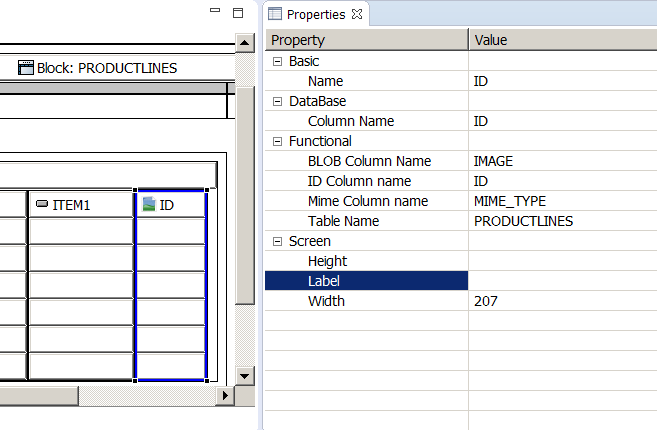
Figure 32.
Image
It is advisable to store images/blobs in a separate table. Also new versions of images should be stored in a new row. CloudaIDE can this way tell wether a image/blob was changed since the last fetch and display the proper version (not relying on the contents of cache). Becuse the url refers to the id of new image/blob, the cache in case of change of the image will not be used.
HTML Area
The HTML area is a static HTML text. It does not belong to block data, and can be used outside any block. To enter HTML text, click the button with ellipsis (…) in the "Text" property value cell.
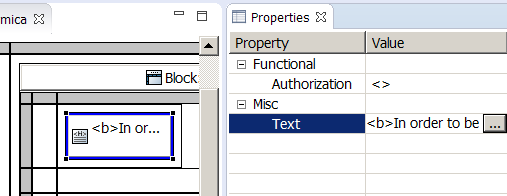
Figure 32.
HTML area
Parameters
Forms can pas values through parameters. Parameters are declared as form property (using form properties editor). Parameters are similar to procedure parameters, but their scope is current form. To refer to a form parameter within MT program programmer has to prefix the parameter name with :parameter string. e.g. to access parameter customer_id use :parameter.customer_id syntax.
Example of form parameters access:
In short, you can use a parameter wherever you can use an expression. Parameters can be also used as default item values, max and min item values, within default where and default order block properties.
You specify arguments for form paramters in two places:
-
In the open_form procedure call
open_form(Ledger, :COMPANY.ID, :COMPANY.NAME, to_text(:TOOLS.MONTH,'yyyy-MM-dd'), :COMPANY.VAT_PAYER, :TOOLS.MONTH <= :FIRMA.CLOSED_MONTH); -
In the "LOV Call" property of a textbox

Figure 33.
"LOV Call" property of a textbox
Application Deployment
CloudaIDE produces a war files to deploy on a J2EE container.
This video shows how to deploy the CloudaIDE application to the Apache Tomcat server.
To produce deployable files the programmer has to:
- Stop the development server (if it is running)
- Select the project in the project explorer
- Choose GWT ➜ Compile context menu option
- Click compile button
The compiler produces all files neceary to deliver the application functionality to a JEE server.
After the application compiles the files contained in the target/App-0.0.1-SNAPSHOT project directory have to be copied to webapps Tomcat directory. This can be done directly or through creation of a war archive. The programmer has to rename the resulting war archive or the directory to the context name of the application i.e. the final part of the application URL. We decided to call the context "demo". The URL will be (depending on your setup) something like "http://server:8080/demo". Since Tomcat version 10 there is a change in the server. The Java EE is replaced by Jakarta EE. The CloudaIDE application should be placed into webapps-javaee directory. If there is no such directory – create it. The server will migrate the Java EE application into Jakarta EE and place it in the webapps directory. Alternatively – use Tomcat migration Tool https://tomcat.apache.org/migration-10.html.
Make copy the context.xml.template from (the misc_files project directory) and rename it to your context (e.g. demo.xml) name. Comment/uncomment the Resource element in the file in a way appropriate for your database. Change the url, username and password to fit your installation (database service address and user). Then place the file in conf/Catalina/localhost directory of the Tomcat server. You can also make a war archive of the application and proceed in "usual" way. This is however beyond the scope of this manual.
Next we start the tomcat server. And that's all.
Designer is an Eclipse application. Therefore many things relevant to Eclipse are also relevant to CloudaIDE.Disabling session id cookie
In order to disable session id cookie edit the /src/main/WEB-INF/App.nocache.jsp file. Follow the instruction contained in the respectful comment in this file.